“I have fought the fight. I have run the race. I have kept the faith.” – II Timothy 4:7
By Cameron Bean
Search
| Sunday | +23° | +15° | |
| Monday | +23° | +15° | |
| Tuesday | +24° | +14° | |
| Wednesday | +26° | +15° | |
| Thursday | +31° | +15° | |
| Friday | +26° | +18° |
Blogger templates
Blogroll
Blogs I Read
Powered by Blogger.
Labels
- #bigwet (1)
- Australia (1)
- Brisbane floods 2013 (1)
- Crank House Cyclery (1)
- cycling (1)
- Cycling and triathlon motivation (1)
- first test ride (1)
- Gatorade (1)
- II Timothy 4:7 (1)
- learn to suffer (1)
- Mental Notes Consulting (1)
- Noosa Triathlon 2012 (1)
- pre wedding training camp (1)
- Queensland Triathlon Series (1)
- Revive Ashgrove (1)
- Running (1)
- Self confidence (1)
- Shoel laces (1)
- Sports psychology (1)
- Sydney (1)
- Trek (1)
- Trek Madone 7.9 (1)
- Trek Speed Concept (1)
- Triathlon Australia (1)
- Triathlon Motivation (2)
- Triathlon Training Tips (3)
Followers
About Me

- Cam and Jess @ livinglovinggrace.com
- We are Jessica (Grace) and Cameron. We were very excited to get engaged on Valentine's Day (2011) and have chosen to blog about the experience of planning our wedding and our relationship in general. Despite meeting while we were both a school (and not being overly friendly!) we didn't get together until 2005 when Cameron was in his first year at uni. We have been pretty much inseperateable ever since. We share a love for being outside, warm days at the beach and exploring new places. We have a habit of being somewhat nomadic and have moved 11 times in 5 years! Nothing makes us happier than putting a smile on other people’s faces or coming home to our crazy but very lovable Border Collie! Our path isn’t always an easy one as Jessica suffers from the genetic condition Cystic Fibrosis. Amidst the challenges this has thrown at us over the past few years it has taught us to LIVE and LOVE every day. To have hope and faith. To take nothing for granted and to truly appreciate the things it is easy to forget!
Popular Posts
-
I guess post #1 is like pulling on the running shoes at the start of the season, something that is both inevitable, but challenging. What ma...
-
Medal from the Gatorade Series Triathlon Series The Event Crew who run the Queensland Tri Series , Sponsored by Gatorade held race 3 o...
-
Inspiration for running is sometimes hard to find, especially on the slow weeks where there is a lot on and your starting to get tired, on...
-
Brisbane floods 2013
-
Have you spent time in the ' sin bin' at triathlon for being busted for drafting?? Well this article is for you. I found thi...
-
This was a great week for training, socialising, being inspired and racing. Taking the time to spend the week at Noosa, made it the most...
-
Let The No Sugar Adventure (NSA) Begin
-
I came across this article in the Spring 2013 edition of the USA triathlon magazine. I htought approriate to share given my flat elastic lac...
This is default featured slide 1 title
Go to Blogger edit html and find these sentences.Now replace these sentences with your own descriptions.
This is default featured slide 2 title
Go to Blogger edit html and find these sentences.Now replace these sentences with your own descriptions.
This is default featured slide 3 title
Go to Blogger edit html and find these sentences.Now replace these sentences with your own descriptions.
This is default featured slide 4 title
Go to Blogger edit html and find these sentences.Now replace these sentences with your own descriptions.
This is default featured slide 5 title
Go to Blogger edit html and find these sentences.Now replace these sentences with your own descriptions.
Tuesday, April 2, 2013
Shoes Laces are they tied up right for you?
I came across this article in the Spring 2013 edition of the USA triathlon magazine. I htought approriate to share given my flat elastic laces have just broken.
This article is from;
http://katierunsthis.com/2011/10/04/running-shoe-lacing-techniques/
This article is from;
http://katierunsthis.com/2011/10/04/running-shoe-lacing-techniques/
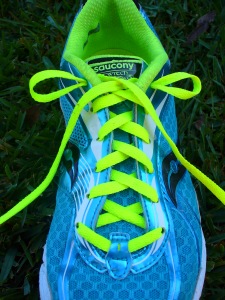
When most runners purchase their running shoes from a specialty running store(You are not still shopping at those big box sporting goods stores, are you?)they are already cross-laced and ready to go. Or are they? Did you know there are different ways that you can lace your shoes to make them more comfortable or to help customize your shoes for your feet? Here are some of the more common shoe lacing patterns that help combat some common shoe issues. I tried to find the brightest shoe laces on the brightest pair of shoes I own so that you could see easier.First, let’s cover the LOOP LACING LOCK. This technique can be used in a number of different lacing patterns to insure a tight and snug fit anywhere along the eye row of your shoe, depending on where your laces seem to be slipping.
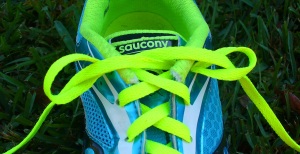
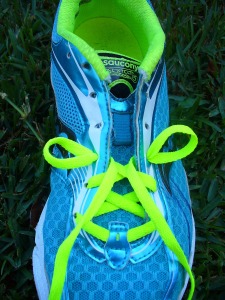
In this example, I have put the loop lacing lock at the top of the shoe. The shoe was cross-laced as usual to the top of the shoe. To accomplish the loop lacing lock, put each lace end back into the same hole it just exited, leaving a small loop on each side.
Then thread each loose end through the loop on the opposite side of the shoe.
Pull tight to make loops smaller. Then tie shoe as usual.PROBLEM: High InstepNear the toe of the shoe, start lacing with the cross-lacing technique. Once you get to the middle of the shoe, thread the laces up the sides of the eye row, leaving room. Continue cross-lacing at the top of the shoe and tie at the top as usual. This will give your foot room in the midfoot area and help keep the shoe from feeling to tight across the arch of the foot.
PROBLEM: Wide ForefootFrom the bottom of the eye row, lace up the sides of the shoe. Once you get to the middle of the shoe (midfoot), start the cross-lacing technique and continue on to the top of the shoe. Tie shoe at the top, as usual. This will give your foot plenty of room to spread or allow your toes to splay while running.
PROBLEM: Narrow FootTo help a shoe fit more snugly on a narrow foot, you might want to try adding a loop lacing lock in the middle of the eye row. To accomplish this, cross-lace the shoe as normal up to the midfoot, add a loop lacing lock, and then continue cross-lacing the shoe to the top. Tie the shoe at the top, as usual. Doing this will double the amount of laces across your midfoot, ensuring a snug fit.
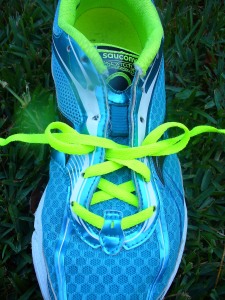
PROBLEM: Heel SlippingThere are two good ways of keeping a shoe from slipping on the heel. The first way is to put a loop lacing lock at the top of the shoe (shown in the beginning of the post) and tie shoe as usual. Another way is to use a modified loop lacing lock, called a “runner’s tie.” To accomplish the runner’s tie, cross-lace the shoe until the second to last top hole and then lace up each side of the eye row. Take each loose lace end and thread it back under the side lace of the opposite side. Tie the shoe at the top, as usual.
PROBLEM: Shoe Feels Too TightTo give your shoe an overall roomier feel, try the parallel lacing technique. To start, lace the first tow eyelets near the toe of the shoe. On one side, pull the lace up through the first eyelet and then straight across the shoe and into the eyelet directly across from it. On the other side, skip the first eyelet and pull the lace up through the second eyelet and then lace it into the eyelet straight across from it. Repeat this skipping an eyelet and lacing across pattern until the shoe is laced to the top. This lacing technique is a little tricky, so here is a link to a video that might help.
PROBLEM: Black ToenailsTo accomplish this threading technique, start by threading one end of the shoe lace through the eyelet at the top of the shoe on the opposite side of your big toe. Leave enough lace length to tie the shoe. Lace the rest of the shoe lace through the eyelet closest to your big toe, creating a diagonal lace down the length of the shoe. Lace this long length of shoe lace straight across toward the outside of the shoe and then diagonally up toward the inside of the shoe. Repeat this lacing pattern until the shoe is laced to the top. Tie the shoe, as usual. Lacing the shoe this way allows the material above your big toe to be pulled up and off of the nail when the outside lace is tugged and tied tightly.
These are just a few alternative lacing techniques that may help solve some common runner’s shoe fit issues. I hope this has been helpful for you!
Have you ever tried any alternative running shoe lacing patterns? What issues with your shoe were you trying to resolve?
Monday, April 1, 2013
Tuesday, March 26, 2013
Saturday, March 23, 2013
Subscribe to:
Posts (Atom)
-
I guess post #1 is like pulling on the running shoes at the start of the season, something that is both inevitable, but challenging. What ma...
-
Medal from the Gatorade Series Triathlon Series The Event Crew who run the Queensland Tri Series , Sponsored by Gatorade held race 3 o...
-
Inspiration for running is sometimes hard to find, especially on the slow weeks where there is a lot on and your starting to get tired, on...
-
Brisbane floods 2013
-
Have you spent time in the ' sin bin' at triathlon for being busted for drafting?? Well this article is for you. I found thi...
-
This was a great week for training, socialising, being inspired and racing. Taking the time to spend the week at Noosa, made it the most...
-
Let The No Sugar Adventure (NSA) Begin
-
I came across this article in the Spring 2013 edition of the USA triathlon magazine. I htought approriate to share given my flat elastic lac...
Categories
- #bigwet (1)
- Australia (1)
- Brisbane floods 2013 (1)
- Crank House Cyclery (1)
- cycling (1)
- Cycling and triathlon motivation (1)
- first test ride (1)
- Gatorade (1)
- II Timothy 4:7 (1)
- learn to suffer (1)
- Mental Notes Consulting (1)
- Noosa Triathlon 2012 (1)
- pre wedding training camp (1)
- Queensland Triathlon Series (1)
- Revive Ashgrove (1)
- Running (1)
- Self confidence (1)
- Shoel laces (1)
- Sports psychology (1)
- Sydney (1)
- Trek (1)
- Trek Madone 7.9 (1)
- Trek Speed Concept (1)
- Triathlon Australia (1)
- Triathlon Motivation (2)
- Triathlon Training Tips (3)


